.png?width=1600&height=900&name=Windows11ProjectPlanTemplateHowToUse%20(1).png)
After helping thousands of IT professionals with our Windows 10 Project Plan Template, we have now launched the Windows 11 version of this valuable resource. If you haven't already downloaded it, you can do so here. However, if you already have it, this article will explain what exactly it is and walk you through how to use it. We will also point you to further resources and talk about how they relate to the project plan.
.png?width=1000&height=563&name=Windows11ProjectPlanTemplateHowToUse%20(1).png)
What Is Juriba's Windows 11 Project Plan Template?
The Windows 11 Project Plan Template is, as the name suggests, a free downloadable template available in MS Project or as PDF that can be used by IT professionals to plan the project management of their Windows 11 migration. Initially created to help organizations move to Windows 7, our project plan templates have been used by thousands of organizations to successfully plan and execute their OS migrations and Evergreen IT management.
The Windows 11 Project Plan Template:
- Includes 733 action items and milestones as well as the estimated timeframe to complete the task broken down into phases,
- Features timelines and Gantt Charts that can be adjusted to your situation within minutes,
- Is created specifically to accelerate migration progress based on data-driven insights and is optimized for smart workflows and automation as well as Microsoft's Windows Ring Deployment concept,
- Works hand-in-hand with Juriba's Workplace Automation platform, Dashworks, and Juriba's application management automation solution, AppM — but can also be used standalone without any Juriba tooling, and
- Highlights the automation opportunities with automation tooling (in orange).
With the project plan template, you not only get access to years of industry experience and best practices baked right into the project plan, but also a strategic resource that enables you to significantly accelerate your project timeline and reduce risks!
Download & Customize The Project Plan Template
The project plan template is designed to be entirely customizable. Simply fill out the form, check your email, choose what format you wish to download the plan in, and click on the download button. If you are going to edit it, just load the project plan template in your MS Project (you will need MS Project 2007 or above to edit the plan). If you would like to first get an overview of the process, you can download the PDF and print it or view it in the browser.
After you have familiarized yourself with the template layout and have gone through the major planning stages in more detail (I will walk you through them below), you can start adjusting the plan to your unique situation! Pro tip: don't get overwhelmed. The plan is extremely thorough and therefore very detailed. It might include tasks or entire sections that you might be able to delete or at least shorten. Alternatively, you might find that you need to expand on certain sections a little as you manage the process differently than described or you have unique requirements.
Now, just add your project start date, check your end date, and possibly edit the buffers to ensure this reflects a realistic timeline for your Windows 11 migration project. Congratulations! You are now ready to start.
How Different Is It From Your Windows 10 Project Plan Template?
If you have downloaded and used our Windows 10 or Evergreen IT Management project plan template before, you might wonder how different it is and if it is worth downloading. While moving to Windows 11 will be relatively similar to your Windows 10 migration, there are some significant differences that meant we needed to add a few tasks, and delete some others.
The project plan accounts for those differences but also takes into account additional tooling and experience IT professionals will have gained managing Windows Servicing for a few years. You will find that I was able to drastically cut and even eliminate steps as well as add a significant amount of steps that can be automated. In short, I certainly recommend downloading the new template for this new project.
Windows 11 Project Plan Template Stages
Let's briefly review all ten template stages for what you are trying to achieve at this point, what time frame you should plan on, and who is primarily targeted in what step. Finally, we will look at how to turn your template into a signed-off plan. The plan should be a living document, baselined, but then continuously updated as you move through the stages:
Step 1: Planning & Mobilization (39 Days or 9%)
I know it is tempting to jump right in, but planning is an absolutely vital step in your Windows 11 migration! Most of the large IT Transformation projects that we've seen fail have done so due to a lack of proper planning. Therefore, you will find in the project plan template 39 days allocated to planning and mobilizing. You start by creating your proposal, which includes identifying the business need for the project and your key stakeholders, as well as creating your business case document.
Then you build your Project Management Repository and Documentation. This includes cost, resources, RAIDs, and operational management planning as well as creating a high-level Gantt chart (think summary rather than detail) and your project team plan. In the Mobilization step, you obtain your project seed funding and mobilize your project team.
Step 2: Discovery (82 Days or 19%)
Now that you have got your administrative ducks in a row, it is time to identify your project scope by doing an Infrastructure Discovery & Assessment. The time required for this step greatly depends on the technology in place (e.g., do you have a desktop agent for software and hardware discovery in place)?
First, we assess the technical architecture including identifying your current desktop management infrastructure and tooling, hardware/software/app usage/user list inventory sources, and much more to create an Initial Discovery Feed Diagram before we dive into further data gathering. This analysis is comprised of infrastructure (e.g., gathering data on network topology, storage capacity, and so on) as well as documenting your virtual infrastructure and usage.
Next, you gather data on your hardware and software. Here, for example, you determine what an application is within your scope (MECM app, package, installed binary, executable), identify application owners, gather software usage/license as well as hardware and software inventory data, and much more. It is important that your team identifies the best available sources for all the required data sets while a technical team later validates those assumptions. If you do not yet have these tools in place, give yourself enough time to evaluate, test, and deploy them.
Step 3: Assessment & Rationalization (64 days or 15%)
Next, we need to assess, build, and set up our toolsets. This includes hardware/software/browser compatibility tooling and a Project Data Warehousing & Workflow Automation solution (think Juriba). Then you will need to perform thorough hardware and software compatibility assessments by listing all compatible and incompatible desktops, laptops, virtual machines/thin clients, and peripherals and then assess them based on a predefined set of rules using automation and workflows.
First, you can use a tool like Juriba AppM to categorize your applications (e.g., into core build or legacy or by criticality, such as business-critical, important, optional) and identify your application types (e.g., 3rd party, in-house developed) before you assess the application compatibility and create a consolidated application list (e.g., keep, retire, forward) and a target state application list. Then confirm with the business units your assessments of which applications should be kept, retired, forwarded, etc., and then generate a Master Application List (MAL) and a Rationalized Application List (RAL).
Finally, you want to assess your users, computers, and apps compatibility by overlaying and connecting the different data points in their context. This process can largely be automated using Dashworks.
Step 4: Technology, Process, & Tool Design (17 days or 4%)
In the next phase, you design the technologies, processes, and tools you will need to support your migration process. Of course, at this point, you also already need to think ahead and keep in mind how your organizations will manage your business as usual environment. It is best to clearly identify the preferred target infrastructure and the overall solution in discussions with your technical as well as your business teams.
Your business team has to check that every technical solution also meets any requirements set out by them. Because you are dealing with many different teams and dependencies, it is advisable to double any time estimates in this step to ensure the solution you end up with is truly robust and scalable.
This step begins with the building of your design team and your tool design resources before moving into the crucial phase of designing your:
- Technology platforms (e.g., your core image, T-minus timeline activities, site readiness)
- Processes (e.g., hardware request and approval process, user acceptance testing and sign-off process, user engagement)
- Tooling (e.g., self-service and validation tools, deployment workflows tools, user migration readiness tools)
Although this won't take too long in terms of the number of days spent, it is important to get this right!
Step 5: Solution Build (18%)
With your solution design complete, you can begin to engage your technical teams to build the technology required to support the project. Again, double any estimates you are given. Consider the amount of time required if new infrastructure must be procured, built, and tested. Consider the skills you have in-house to apply the technology, and who is available to test and review it. The people that most often build the solution are typically stretched thin at this point, so either ensure you can get their dedicated time or plan for a non-dedicated resource here.
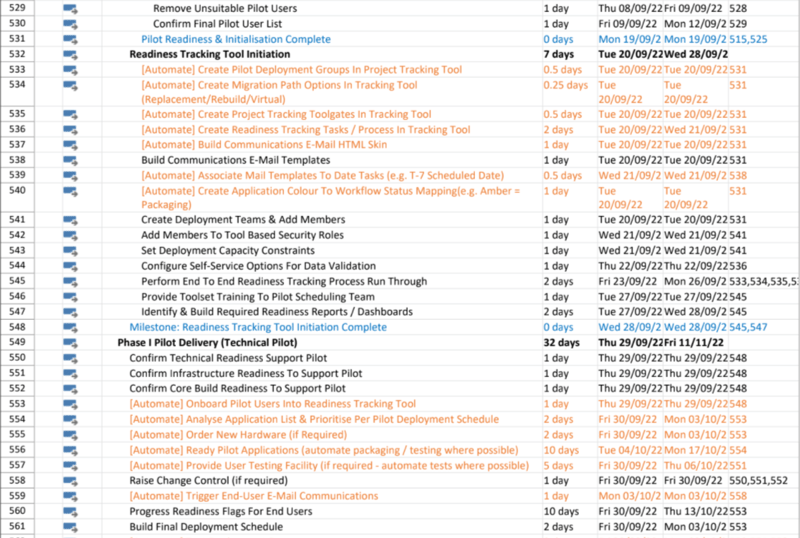
Step 6: Migration Readiness Management (64 Days 15%)
Compared to our Windows 10 Project Plan Template, we can reduce the number of days spent on this by 64% because of the level of automation we can apply here, reducing the overall time to just over two months or 15% of the project! This is exciting because this is the step when you take everything you did up to now and take it out to your end users. You will test all your processes and then it is go time!
Here you will build new or upgrade your existing desktop management infrastructure (you will need at least SCCM 2016), your VDI, Application Virtualization Infrastructure, as well as your storage and network infrastructure before creating your Core Engineering Build, Core Application Build, and Migration Management Solution Build. Finally, you build your tooling which is quickly done with Juriba Dashworks. Don't forget about building your end user training, communication, etc.
Given the tasks at hand for this step, you can expect a lot of discussions within the workstreams. How much time you will need greatly depends on how well you planned. For example, you can build a great readiness plan if you have defined an app priority and start to forecast your deployments. This means you need to understand each team's capacity constraints, such as the possible number of apps delivered per week from the app packaging team.
To ensure a smooth migration, manage everything in a central command and control center, eliminate any overly complex items from your list to get out pilots as quickly as you can, and have regular meetings with everyone involved.
Step 7: Ready (83 Days or 19%)
Finally, it is time to migrate! All your ducks are in a row and you are ready to go. You start this phase by running a deployment pilot by initiating the pilot, you ensure your tracking tool readiness, and roll out first your technical pilot and then your tools, processes, and technology pilot. At this point, your logistical teams will have to assume everything is ready for delivery. Be sure that all blackout dates and milestones are in your project management tool and that you are aware of how many deployments your team can physically handle per week (although you should always account for order delays, user unavailability, and other issues that might arise with a little extra buffer).
Step 8: Deployment (77 Days or 18%)
Deployment time. After an initial forecasting phase, you will head into full-scale deployment. Depending on the number of users, you will probably deploy in multiple waves or tranches. The project plan maps out all tasks per tranche. Simply copy and paste the tranche section after customizing it to your needs to add the additional deployment waves you need. Please note that the orange color in the project plan indicates the tasks that can be automated. As you can see, almost all tasks here are workflow-driven and automated.
Step 9: Operate (83 Days or 19%)
Now that the deployment is over, you can hand over your project to your Business-as-Usual team and move into the Continuous Improvement Phase. This happens by ensuring system and resource readiness, as well as by creating documentation and disaster recovery. The majority of this phase, however, is taken up by tracking the volumes of your Windows 11 problem tickets, analyzing them for the top end-user issues, providing feedback to the engineering build roadmap, and ensuring that a process is in place to update the core image and existing Windows 11 machines.
Step 10: Project Close Down (10 Days or 2%)
By now, you are probably sick of hearing the words "Windows 11 migration". However, you aren't done just yet. It is important for the success of this and future projects to close down the project properly by reviewing and documenting lessons learned. Ensure that you plan enough time to determine operational success. Collect your team and gather end-user satisfaction, team and executive stakeholder feedback and do a full write-up on all the project elements that worked well (and on those that did not) so you can learn for future projects.
Congratulations! You have made it. I hope this is helpful and enables you to plan for a smooth and efficient migration. If you are looking for another way to significantly cut time, resources, and budget for your Windows 11 migration, I highly recommend that you check out our Windows 11 Assessment Service which is the fastest way to get a comprehensive 360-degree view of your hardware and software compatibility. The program opens in November 2021, but you can register your interest right now.

![Windows 11 Enterprise Vs. Professional [A Comparison]](https://blog.juriba.com/hs-fs/hubfs/Windows%2011%20Enterprise%20Vs.%20Professional%20%5BA%20Comparison%5D.jpg?width=1600&height=900&name=Windows%2011%20Enterprise%20Vs.%20Professional%20%5BA%20Comparison%5D.jpg)


.jpg?width=1600&height=900&name=What%20You%20Have%20To%20Know%20About%20The%20Windows%2010%20Long-Term%20Servicing%20Channel%20(1).jpg)

