
Rolling out Office 365 can be very exciting considering the value it will add to your organization in terms of unified communication, collaboration, and business processes! But it can be equally terrifying if you think about all the dependencies of users, mailboxes, delegates, mail archives, public folders, groups, instant messaging, ... the list goes on and on.
After the initial migration is completed, Microsoft will release two larger Office client feature updates and monthly security updates to increase productivity for your end users and tighten security. However, just like Windows as a Service, these larger feature updates will need to be rolled out effectively as they can also be considered a mini-migration.
But fear not — it initially sounds worse than it has to be. Today, I want to walk you through seven strategically planned steps using Juriba's IT Transformation Management tool, Dashworks, that allow you to streamline a one-time migration as well as an Office upgrade rollout process in Business-as-Usual mode. The steps are:
- Gather Your Required Information
- Validate, Rationalize & Model Your Data Set
- Create Your Project
- Onboard Your In-Scope Users, Mailboxes & Applications
- Batch, Track Readiness & Schedule Asset Upgrades
- Perform Migration
- Understand Post-Migration & Provide Streamlined Reporting
Before we dive into each step further, I encourage you to download our fully customizable Office 365 Project Plan template in Microsoft Project or PDF format so you can follow along.

1) Gather Your Required User, Mailbox, Delegate, Public Folder, Mobile Device, Telephony, Archive, Instant Messaging, VoIP, Shared Drive & SharePoint Application Information
Dashworks seamlessly connects to your existing repositories for your critical project data. Using our certified connectors to tools like Active Directory and Exchange, all required information is collated in minutes and aggregated into the central data warehouse.
Additional data is then gleaned from email archive systems, mobile device inventory, PC software inventory (e.g., installed Outlook version), Instant Messaging systems, shared drives, telephony and even Notes/SharePoint applications.
Organizational data is then layered on to add locations and departments. Finally, custom fields are applied so that a full set of project baseline data is available. Where connectors are used, this data will refresh on the schedule you define (usually nightly).
2) Validate, Rationalize & Model Your Data Set
Once all of your data is in Dashworks, the next step is to check the quality and remove the things you don’t care about. This means identifying mailboxes, users, file structures and devices that are not applicable for the project and ensuring that your locations contain the right number of users. You can do this within minutes or hours, rather than days and weeks, by simply drilling, slicing and dicing the data set to filter out non in-scope users.
From here, Dashworks can be hooked into tools like Quest Migration Manager, Binary Tree and Archive 360 to understand what should be in and out of scope, and where the biggest migration hurdles may surface.
3) Create Your Project
Now you tell Dashworks how you want to manage your Office 365 migration project.
Create your migration paths (e.g., shared mailboxes vs. personal mailboxes), your applications (public folder and shared drives), the tasks you want to track, your groups and deployment teams, the emails you want to send and on which T-minus based schedule, and the configuration of the self-service portal. This project configuration is your blueprint for managing your Office 365 migration.
4) Onboard Your In-Scope Users, Mailboxes & Applications
Now it is time to move your project into action.
Your mailboxes, applications and devices inherit the default readiness status, and groups can be analyzed for delegation, size of migration, mobile device impact, file system complexity and archive impact. Schedulers can begin their work, and reports can be extracted to initiate key activities such as availability of new infrastructure, synchronization status of mailbox, calendar, and file content, and readiness of any associated SharePoint applications. It is here that your Office 365 project workload begins to take shape.
5) Batch, Ready & Schedule
Your project resources are now moving things forward to get the mailboxes, users and applications / file systems to a green (ready) status. Emails are triggered to your end users informing them of the upcoming migration and their scheduled date. You can also ask your users to further validated and rationalized data, including public folders, through the self-service portal, SharePoint site and mailbox delegation requirements. Dashboards display real-time progress and what is holding up the most migrations. At this point your project engine is pumping, and you are in complete control.
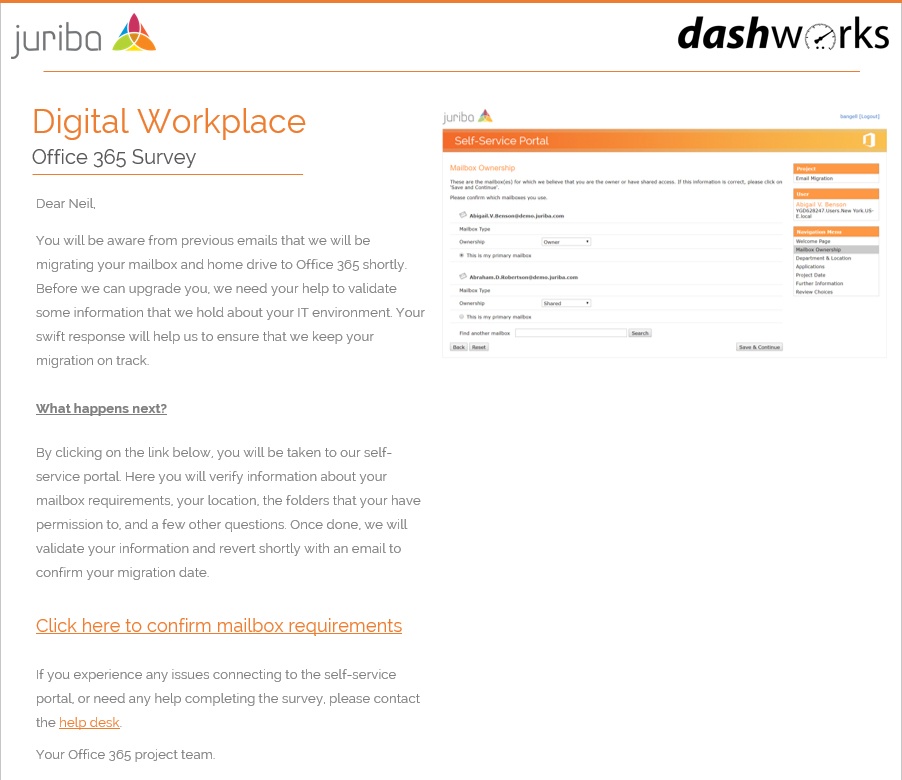
The screenshot above shows an example of an email triggered during an Office 365 migration to validate mailbox delegate right requirements. It showcases the tool's email communication capabilities nicely.
6) Migration
As your readiness items complete, and your organizational assets turn green for migration, it is time to lock in the schedule. Your final emails are sent, and the logistics activities are set in motion. Dashworks checks the synchronization status of the source and target environments before triggering the migration activity through tools like Microsoft’s own PowerShell scripts, Quest Migration Manager and Binary Tree, and reports back on deployment success. Many Dashworks scheduled projects also work in a very complimentary fashion with the Microsoft Fast Track team.
7) Post-Migration & Reporting
Of course, your project does not finish with the migration activity — you still need to wrap up your project.
There are post-migration clean-up tasks that need tracking before you can truly claim success. Mailbox validation, re-establishing the archives, user acceptance and deletion of the old mailbox are all activities that may need tracking. Post-migration surveys are sent to ensure that users have access to their expected resources and have not lost data in migration. Generating your project status report is done at the click of a button, and you can relax in the knowledge of an Office 365 migration well done.
What Is Your Go-To Strategy When It Comes To Office 365 Rollouts? What Have You Struggled With?
I hope you found the step-by-step walk-through of how to plan and execute an efficient and fast Office 365 migration and upgrade rollout helpful. Do you have any go-to strategy you have implemented successfully in the past? And on the flip-side, were there any slippery slopes you would rather stay away from next time around? I would love to hear them. Please feel free to share in the comments below.
Topics:


.jpg?width=1600&height=900&name=Understanding%20The%20Office%20365%20Servicing%20Timeline%20(As%20of%20May%202021).jpg)


